How to Sharpen a Serrated Knife
Not on a whetstone, not in a pull-through, and not on both sides. A serrated edge is sharpened one scallop at a time, from one face only, with a rod that fits.
How this is funded: we earn a commission if you buy through our links, at no extra cost to you. As an Amazon Associate we earn from qualifying purchases. It never changes which knife we recommend, and we’ll tell you when we’d skip one. Full disclosure.
Serrated knives get treated as disposable, and they should not be. A bread knife is one of the three knives most kitchens genuinely need, it costs real money, and it can be sharpened perfectly well — just not with any of the tools you use on everything else.
The reason is structural. A serrated edge is a row of teeth separated by curved valleys called gullets. The teeth are the high points that take the impact against the board; the gullets are the recessed curves that actually do the cutting. Because the cutting surface is recessed, a flat abrasive physically cannot reach it — a whetstone only ever touches the teeth.
Most serrated knives are chisel ground
This is the fact that decides the whole method. As Sharpening Supplies puts it, “most serrated knives are chisel ground, one side is beveled, while the back is flat.” One face carries all the grinding; the other is a flat plane.
So you sharpen one side. All of the work goes on the beveled face, following the existing angle inside each gullet. The flat side is left alone entirely except for a single gentle deburring pass at the end. Sharpening both sides of a chisel-ground edge is the fastest way to destroy the geometry the maker built in.
To find the beveled side, sight along the edge from the tip under a light. One face will show a visible angled facet inside each scallop; the other will look flat all the way to the apex.
Why the rod has to be tapered
Serrations are not a single size. They vary between a bread knife’s wide scallops and a utility knife’s fine ones, and they often vary along a single blade. A cylindrical rod that fits one gullet will either ride up on the teeth of a smaller one or fail to reach the bottom of a larger one.
A tapered rod solves that by letting you choose the contact diameter: slide it in until it fills the curve and stop. DMT’s own instruction is exactly this — “position the rod so it fills the gullet without riding up onto the teeth.” Get that wrong in the direction of too large and you grind the points off, which is the classic way people ruin a serrated knife while trying to sharpen it.
The marker trick
Color the bevel inside a few scallops with a permanent marker before you start. As you work, the ink comes off precisely where the rod is touching. If the ink is disappearing from the bevel, your angle is right. If it is disappearing from the teeth above the gullet, the rod is too large or you are holding it too high.
It is a thirty-second check that turns an invisible process into a visible one, and it works just as well on a straight edge — the same trick appears in why your knife won’t get sharp.
Stroke direction and pressure
Push the rod along the curve of the gullet away from the edge, not into it. Four to six light strokes per scallop is normally plenty. This is not a job that rewards force: diamond in particular cuts quickly, and a heavy hand takes metal off the teeth as well as the gullets.
You are finished with a gullet when you can feel a very slight burr on the flat side behind that tooth. That is the same test as on a straight edge — the burr is the proof that you have reached the apex.
Deburring without rounding the points
Lay the flat face of the blade completely flat on a fine stone or a leather strop and make one or two feather-light edge-trailing passes along its whole length. The instruction worth repeating is DMT’s: “the goal is to deburr without rounding over the points.”
Flat means flat. Any angle here starts putting a second bevel on the back of a chisel-ground edge, which is exactly what you are trying to avoid. A strop is the more forgiving option because leather has a little give and it is very hard to remove much metal with one.
What not to do
- Do not use a pull-through sharpener. It sets a fixed angle across a straight edge and grinds the tips off the teeth in a handful of passes. You end up with a flat blade that has a decorative wave pattern and no cutting ability.
- Do not use an electric sharpener’s serrated stage as sharpening. Where one exists it typically hones the tips of the teeth. That is maintenance of the wrong surface — the gullets are still dull.
- Do not drag it along a whetstone. The stone can only touch the teeth. Every pass erases a little more of the pattern.
- Do not sharpen the flat side. Beyond the single deburring pass, working the back of a chisel-ground edge only removes the steel that forms the apex.
How often, and when not to bother
Rarely. The teeth protect the gullets from the board, which is why serrated knives stay usable for years while a straight edge dulls in weeks. If your bread knife is crushing a loaf rather than slicing it, or tearing the skin of a tomato instead of starting the cut, it is time.
And if the knife is a cheap stamped bread knife whose serrations have already been flattened by a pull-through, be realistic: restoring the pattern is a bigger job than the knife is worth. The tapered rod is for maintaining a good serrated edge, not for resurrecting a destroyed one — the same judgment call as deciding whether a chip is worth grinding out.
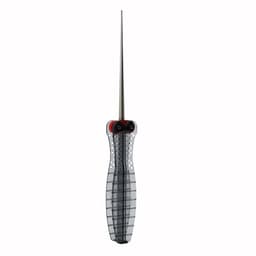
Our pick — the tapered rod with a published grade
DMT Diafold Serrated Knife Sharpener, Fine (FSKF)
The tool a serrated knife actually needs: a tapered diamond rod that fills each gullet at whatever diameter it happens to be, from a bread knife's wide scallops down to a pocket knife's. Folds into its own handle, which is why it survives a drawer.
See the other DMT abrasivesPrice as of October 19, 2026. #ad How we’re funded
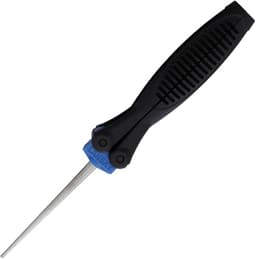
The cheaper tapered rod
Lansky Folding Diamond Tapered Rod
The cheaper tapered rod. Same idea as the DMT — a cone of diamond abrasive that fits itself to each scallop — with a folding handle and a lower price. Lansky does not publish a mesh or micron figure for it, which is the one thing we hold against it.
See the sharpening systems comparedPrice as of October 19, 2026. #ad How we’re funded
Frequently asked questions
Can you sharpen a serrated knife?
Yes, and it works well — it is just a different method. Each scallop is sharpened individually with a tapered rod that fits the curve, working only the beveled face of what is usually a chisel-ground edge, then the flat side is deburred at the end. What you cannot do is drag a serrated knife across a flat whetstone.
What do you use to sharpen a serrated knife?
A tapered rod — diamond or ceramic. The taper matters because serrations vary in size along a blade and between knives, so a cone-shaped rod can be slid in until it fills each gullet. A cylindrical rod of the wrong diameter either rides on the teeth or fails to reach the bottom of the scallop.
Can you sharpen a serrated knife on a whetstone?
Not the serrations. A flat stone can only touch the points of the teeth, so all it does is grind the teeth down and gradually erase the pattern. The one legitimate use for a flat stone on a serrated knife is a very light pass on the flat back to remove a burr after you have sharpened the gullets with a rod.
Which side of a serrated knife do you sharpen?
The beveled one only. Most serrated knives are chisel ground: one side carries the bevel, the back is flat. Sharpening the flat side does nothing useful and, done repeatedly, will destroy the geometry. The flat side gets one gentle deburring pass at the very end, and nothing more.
How often does a serrated knife need sharpening?
Far less often than a straight-edged knife. The teeth take the impact against the board while the gullets do the cutting and stay protected, so a bread knife can go years before it genuinely needs work. If yours is tearing bread rather than slicing it, that is the signal.
Can you use a pull-through sharpener on a serrated knife?
No. A pull-through sets a fixed angle across a straight edge and will grind the tips off the teeth in a few passes, leaving a flat blade with a decorative wavy pattern and no cutting ability. Some machines advertise a serrated stage, which typically just hones the tips — it is not sharpening the gullets.
Sources
- How to Sharpen a Serrated Knife with the DMT Serrated Knife Sharpener — Sharpening Supplies — 'Most serrated knives are chisel ground, one side is beveled, while the back is flat' — plus the tapered-rod fit ('position the rod so it fills the gullet without riding up onto the teeth'), the marker trick for staying on the bevel, and edge-trailing deburring on the flat side (accessed August 18, 2026)
- DMT Diamond and Ceramic Color-Coded Grit Chart — Sharpening Supplies — DMT's own color codes with the mesh and micron figure for each grade (Coarse 325/45 µm, Fine 600/25 µm, Extra-Fine 1200/9 µm) (accessed August 11, 2026)
- Knife sharpening — Wikipedia — Reference on edge angle, coarse-to-fine grit progression, and honing vs sharpening (accessed July 21, 2026)
Per-knife specs (steel, HRC, blade length, geometry) are read from each maker’s spec sheet or product listing and dated on the individual review cards above. “Not published” means the manufacturer does not state that figure — we flag it rather than guess.
Keep reading
Best Serrated Knife Sharpeners
Four tools that actually fit the gullets, ranked on published grit and taper.
See the picksHow to Sharpen a Knife on a Whetstone
The method for every straight-edged knife in the drawer.
Learn the techniqueBest Knife Sharpening Systems
Guided clamps, electrics and pull-throughs, ranked honestly.
See the roundupBest Diamond Sharpening Stones
The same abrasive in a flat format, for everything else.
See the diamond platesWhy Your Knife Won't Get Sharp
Six causes, in the order worth checking.
Troubleshoot itDMT Diafold Serrated Review
The tapered rod this method assumes, examined on published figures.
Read the review