How to Sharpen a Knife on a Whetstone
A repeatable, no-mystique workflow — soak, angle, grit progression, burr, strop — that turns any knife, cheap or expensive, genuinely sharp.
How this is funded: we earn a commission if you buy through our links, at no extra cost to you. As an Amazon Associate we earn from qualifying purchases. It never changes which knife we recommend, and we’ll tell you when we’d skip one. Full disclosure.
Sharpening a knife on a whetstone is the highest-value kitchen skill there is, and it’s far simpler than the mystique suggests. You are doing one thing: grinding two flat planes until they meet at a clean apex, then polishing that apex smooth. Do it once and any knife you own — a $45 Victorinox or a $200 gyuto — becomes genuinely sharp. Below is the full workflow. Read it through once, then keep it open the first few times.
What you need
- A combination whetstone, 1000-grit on one side to sharpen and 6000 (or 3000) on the other to refine. That single stone handles almost every kitchen knife — see our best whetstones.
- A non-slip base or a damp towelso the stone can’t move.
- Waterfor the stone, and a cloth. That’s it — no honing oil, no pull-through gadget, no jig required. How the water goes on depends on which stone you bought: soaking stones need five to fifteen minutes submerged before you start, splash-and-go stones want nothing but a wet surface, and the difference matters enough that soaking a whetstone covers how to tell which one you own.
The workflow, step by step
Each step below is one part of the same simple loop: pick an angle, grind until a burr forms, switch sides, refine, then remove the burr.
- Soak or wet the stone. Soak a soft water stone for 5-10 minutes until bubbles stop rising. A splash-and-go ceramic just needs a few seconds under the tap. Set it on a non-slip base or a damp towel so it can't skate.
- Find and hold the angle. Aim for about 15 degrees per side for a Japanese knife, 20 degrees for a Western one. A rough guide: lay the blade flat, then lift the spine about two stacked coins high. Keep that angle constant for every stroke — consistency matters more than the exact number.
- Sharpen on the coarse side. Starting on the 1000-grit side, push the edge across the stone as if shaving a thin layer off it, covering the whole blade from heel to tip in sections. Use light, even pressure. Work one side until you can feel a tiny burr on the opposite side along the full edge.
- Raise a burr, then switch sides. The burr — a faint wire of metal folded to the far side — tells you the two bevels have met at an apex. Once you can feel it along the whole edge, flip the knife and repeat on the other side until a burr forms on the first side.
- Refine on the fine side. Move to the 6000-grit (or 3000) side and repeat the same strokes with lighter pressure, alternating sides. This polishes the edge and shrinks the burr, turning a sharp edge into a keen, smooth one.
- Remove the burr. Finish with a few very light, edge-trailing passes alternating sides on the fine stone, then strop on the back of a leather belt or a piece of denim to knock off the last of the burr. A knife that still has a burr feels sharp but dulls almost immediately.
- Test and maintain. Test on paper or a tomato — a sharp edge bites in without sawing. Rinse and dry the knife and the stone. Between sharpenings, hone a soft Western edge before cooking; touch up a hard Japanese edge on the fine stone when it stops biting.
The three mistakes that ruin a sharpening session
Almost every failed attempt comes down to one of these. Wandering angle:lifting or dropping the spine between strokes rounds the edge into a dull curve — lock your wrist and move from the shoulder. Skipping the burr:if you never feel a burr, the bevels haven’t met and the knife won’t get sharp no matter how long you rub. Leaving the burr on:a knife with an unremoved burr feels razor-sharp for about three cuts, then goes dull as the wire folds over — always finish with light deburring passes and a strop.
How often to sharpen
Sharpen when honing stops working. In practice a home cook using a soft Western knife daily sharpens on a stone every month or two and hones before most sessions in between; a harder Japanese knife holds its edge longer and needs the stone less often. Don’t over-sharpen — every session removes a little metal, so touch up only when the edge genuinely stops biting. If you’re unclear on the honing-versus- sharpening distinction, our sharpening vs honing explainer sorts it out.
The stone we’d start you on
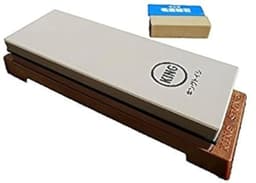
Our top whetstone pick
King (Matsunaga) KW-65 1000/6000 Combination Whetstone
The stone that has taught more people to sharpen than any other. One side 1000-grit to set an edge, one side 6000-grit to polish it, made in Japan, for the price of a takeout dinner. Start here.
Read the full comparisonFrequently asked questions
What angle should I sharpen a kitchen knife at?
About 15 degrees per side for Japanese knives and 20 degrees for Western knives. If you're unsure, 15-17 degrees is a safe compromise for most kitchen knives. The exact number matters less than holding whatever angle you pick consistently for every stroke — an inconsistent angle rounds the edge and undoes your work.
How do I know when a knife is sharp enough?
Two tests. First, feel for a burr while sharpening — a tiny wire of metal on the opposite side means the bevels have met. Second, after deburring, the edge should bite into paper or slice a tomato skin without sawing. If it slides or crushes, keep going or check your angle.
How often should I sharpen my knife?
Sharpen on a stone when honing no longer restores the bite — for a home cook using a soft Western knife regularly, that's roughly every 1-2 months. Harder Japanese knives hold their edge longer and need it less often. Between sharpenings, hone a soft Western edge before most cooking sessions.
Do I need to soak a whetstone before sharpening?
It depends on the stone. Soak soft water stones (like a King) for 5-10 minutes; splash-and-go ceramics (like a Shapton Glass) need only a quick rinse. Never soak a splash-and-go stone for long — it can crack. Each stone lists its prep in our whetstone roundup.
Can I sharpen a serrated or bread knife on a whetstone?
No — serrated knives need a tapered rod that fits each scallop, and even then they're fiddly. A flat whetstone is for straight-edged knives (chef's, gyuto, santoku, paring). Most people simply replace an inexpensive serrated bread knife when it dulls.
Sources
- Knife sharpening — Wikipedia — Reference on edge angle, coarse-to-fine grit progression, and honing vs sharpening (accessed July 21, 2026)
- How to Sharpen a Knife With a Whetstone — Montana Knife Company — Master-bladesmith walkthrough of whetstone angle, grit progression and deburring (accessed July 21, 2026)
- 20° & 25° Angle Guides for Whetstone Sharpeners — Work Sharp — Tool-maker reference for common Western (20°) vs finer (Japanese) sharpening angles (accessed July 21, 2026)
Per-knife specs (steel, HRC, blade length, geometry) are read from each maker’s spec sheet or product listing and dated on the individual review cards above. “Not published” means the manufacturer does not state that figure — we flag it rather than guess.
Keep reading
Best Whetstones
The stones worth buying, with live prices.
See the stonesWhetstone Grit Guide
Which grits to use, and why higher isn't always better.
Understand gritSharpening vs Honing
Why a stone and a honing rod aren't the same thing.
Learn the differenceBest Beginner Whetstones
The most forgiving stones to learn this on.
See beginner stonesWhy Your Knife Won't Get Sharp
When the method above doesn't produce an edge.
Troubleshoot itKnife Sharpening Angle Guide
Three ways to hold an angle without a jig.
Read the angle guideHow to Flatten a Whetstone
A dished stone quietly undoes all of this.
Read the guideHow to Strop a Knife
The final step, and the one most people skip.
Read the how-toHow Often to Sharpen a Knife
How rarely you need to do this if you hone weekly.
Read the guideHow to Sharpen a Serrated Knife
The one knife in the drawer this method will not work on.
See the method